

How To Repair Rotted Porch Floor
Rescue an one-time wooden porch from the elements.
Past Clint C. Thomas, Esq.
Your house is in a abiding state of battle with the sun and pelting. The heat from the lord's day, particularly in the hot summertime months, wreaks havoc on paint and caulk. Rainwater presents the biggest long-term threat to any manmade structure. Wind and extreme cold temperatures also pose their own threats to houses. Even if a house has an exterior veneer comprised of brick, stone or vinyl, other parts of the house will still be constructed of wood. Porches are near e'er made of wood, and many older homes take a porch floor fabricated from tongue-and-groove lumber.
Knowing the devastating effects that h2o will accept on a forest porch, older homes were built and so the porch floors gently sloped from the business firm to the exterior edge of the porch. This was washed to allow rainwater to run off the porch and not accumulate in puddles that would eventually rot the flooring. In addition to a water-draining design, older homes likewise had the advantage of beingness painted with atomic number 82-based paint. Now no longer used due to wellness and environmental concerns, lead-based paint, for all of its negatives, was very durable. Our grandparents would only have to pigment their houses every twenty to thirty years. Whereas, our generation is having to repaint well-nigh every ten years with 15 years existence on the outside extreme.
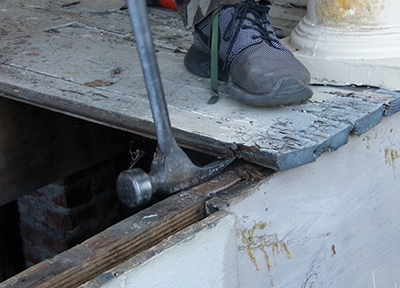
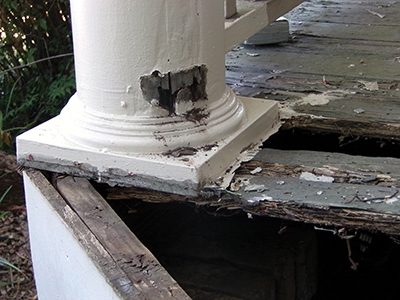
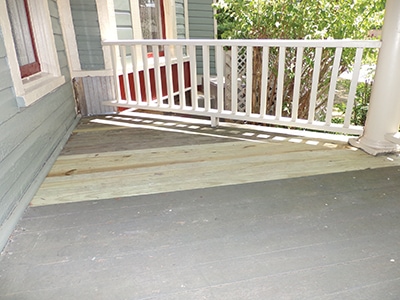
The porch on i of my houses had taken a chirapsia over the years and was start to show signs of serious water-related issues. A couple of the columns supporting the roof were beginning to sink into the floor, and one outside edge is what I refer to as a "problem spot" considering of where information technology is situated. A gable on the main roof of the house channels a lot of water onto the end of the porch roof, which is constructed with a 23.v-degree outside bending of its own. This results in a heavy amount of runoff beingness diddled into this end of the porch.
I decided to replace the unabridged side of porch flooring with the exception of a roughly 4-ft. bridge that I could tell was the original porch flooring from when the house was congenital in 1880. Since this section was still in pretty adept shape and was too original to the house, I decided to leave it and only replace what was on both sides of it.
Materials
I am of the belief that the only two materials to apply on the exterior of historic homes are force per unit area-treated lumber or some type of plastic/polymer product. The 2 porch columns that were sinking into the floor were in skilful shape since someone else had already replaced their wooden bases with blended bases. Even though the floor under the base of operations plate was rotting, which caused the posts to sink, the bases themselves were in perfect shape.
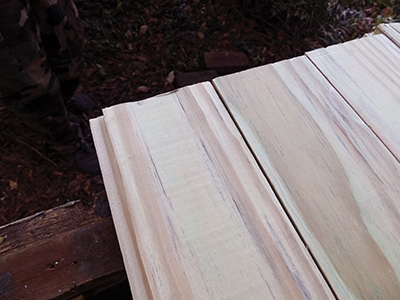
In order to repair my porch I needed to utilize tongue-and-groove (T&M) lumber. Yet, I've nonetheless to find whatsoever place that sells force per unit area-treated T&G lumber. The floor that I was replacing was untreated 1×four T&Thou pino. I decided to mill my ain T&M from pressure level-treated 1x4x8 stock.
In society to do this, I would buy xx to thirty pieces of treated 1x4x8 from my local lumber yard at a time, making certain that I would go the best looking pieces (not warped or bowed). The adjacent step is to let the lumber dry out. Treated lumber is milled while information technology is moisture and is unremarkably still wet when it is received past the lumber chiliad. Through trial and error, I determined it is much harder to manufactory a tongue and groove on moisture wood. Notwithstanding, don't but throw the wood into the August sun for a couples of days, because information technology will warp and bow in unimaginable means. I learned this the hard fashion. The best method is to stack the lumber tightly together in a packet and place some weighted objects on acme of it at each finish and in the middle. Lay the bundle of lumber in a place that gets some sun but not the full direct sun of belatedly summer. After about three days of this, move the lumber onto your porch out of the sun. Rearrange the lumber in the bundle; place the wetter pieces toward the tiptop of the stack and leave it for the remainder of the calendar week.
Milling
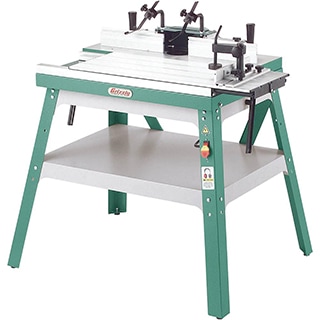
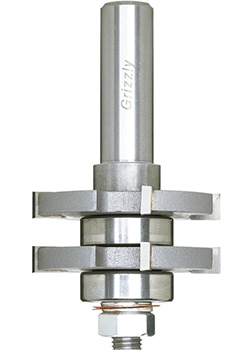
Once the wood has stale out sufficiently it can easily be milled on a router table using a natural language-and-groove bit. I prefer using a router flake with a 2-in. arbor for this job. I also highly recommend purchasing a router with the highest horsepower you lot tin can find and 1 from a reputable manufacturer. Running twenty and xxx boards through a router, adjusting the scrap for the other side, then making the same number of passes puts a lot of strain on the router motor.
Every bit I milled the natural language, or male person cease, on each piece I would run a 1/4-in. wood chisel down either side of the natural language to clean upward the cutting and brand certain it was smooth. Once the wood is milled, be sure to stack it back as previously described out of direct sunlight, weighting the stack to prevent warping or bowing.
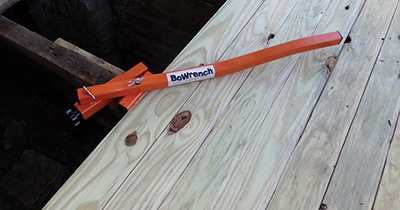
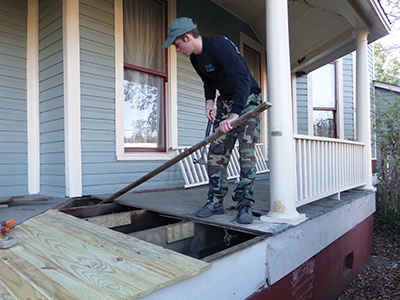
A BoWrench is a handy tool for bending bowed boards and for endmost T&G joints.With the lumber milled, brainstorm removing the old porch flooring. My son Sterling and I used framing hammers and a pry bar to pull it all up without much difficulty.

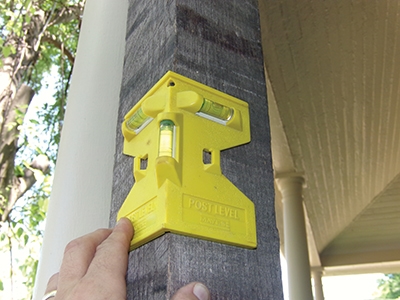
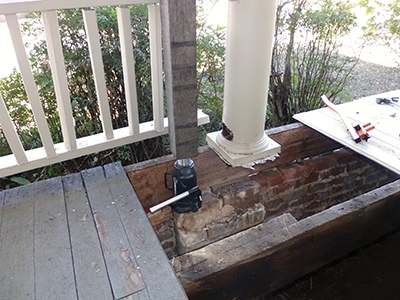
The hard part came when we reached a column. Needless to say, it's not feasible to simply remove the flooring from nether the cavalcade. The cavalcade is supporting the roof, therefore the load has to be supported to remove the column. In club to do this, we removed the flooring up to the column and and then placed a xx-ton hydraulic bottle jack on tiptop of the brick foundation under the porch. Nosotros used a crude cut 4×iv mail service as the jacking piece between the jack and the porch header. I and so slowly jacked that section of the porch up off the old floor. Brand certain that the 4×four mail you are using on summit of the jack is perfectly plumb. I used a postal service-level for this chore. If the post is not plumb—straight upwards and down—the resulting bending tin cause the post to slip, often violently, off the jack. This can result in actual injury to whomever is operating the jack or damage to your house when everything crashes back downwardly, or both.
I too strongly recommend removing the erstwhile flooring and installing new flooring up to a bespeak that is near to each cavalcade to be jacked-up. Since the boards interlock each other, having the mating boards in place reduces the amount of time that whatsoever ane column volition exist suspended in mid-air past merely the jack. Likewise, exist certain to place the jack on the side of the column that is the farthest from the area that you are working. Otherwise, you will meet the jack before you have installed the new flooring under the column.
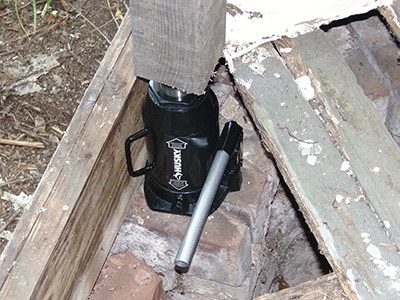
With the column suspended we were able to remove the old flooring beneath information technology. We used a reciprocating saw with a metal-cut blade to remove a smash or ii that nosotros discovered under the column.
Installing the newly milled T&G flooring was probably the near difficult role of the project. Some of the pieces would slide easily together while others were very stubborn and had to be persuaded together. Through experience my son and I adamant that the best way to install each piece was to start at the outside and slide the new piece of flooring forth the natural language of the last i installed. Even with using careful storing techniques there will be some minor warping and cupping that make the installation process more than hard.
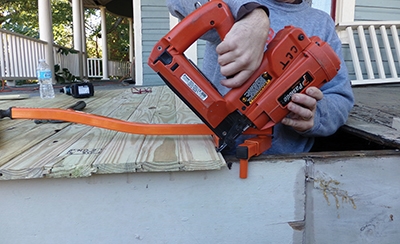
Every bit each piece is fitted in place I would nail information technology diagonally (45-deg. angle) through the tongue. This eliminates any holes on the exterior of each piece of wood. We discovered that in the nailing process the outer edge of the new slice of floor would be pushed down slightly by virtue of the downward pressure exerted by the nail gun. This downwards angle of the board would hinder the installation of the side by side piece until nosotros learned to rectify the problem past striking each installed lath from the lesser with a hammer directly adjacent to each joist that it was nailed into. This eliminated a lot of installation problems.
For the about part, any slice of flooring that wouldn't easily slide the entire length of the last installed piece could so be persuaded by a few business firm blows from a hammer and cake on its outside cease.
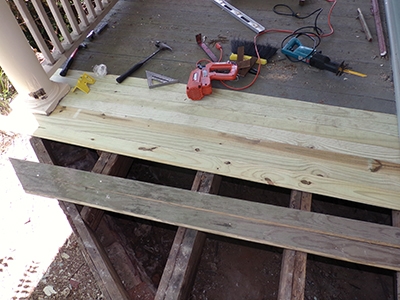
In gild to obtain a tight jointing of each piece of T&G lumber nosotros employed a tool called a BoWrench. This is a truly wonderful device that clamps itself onto a floor joist and and then uses the reverse pressure level to identify tension on the piece of lumber being installed. It comes with a regular head that fits around modern ii× type lumber. However, I recommend the adaptable head that will allow it to fit over true dimensional lumber and also over multiple pieces of modern 2× type lumber.
All of the angle cuts were made using a miter saw. In one case installed, the outside ends of the new pieces of porch flooring were cut off with a jig saw after marker a directly line with a chalk-reel.
Equally a last proffer, the jacking up of the columns likewise necessitated the removal of the porch railings. The all-time and easiest mode to do this is to loosen the joints where they connect to each cavalcade and then run a reciprocating saw with a metallic-cutting blade through the articulation to cut the nails off. Once each section of railing is loosened information technology tin then be removed by lifting information technology up and sliding it out of place. Porch columns, especially older ones, are tapered and so they are wider at the bottom and more narrow at the top. This allows for the easy removal of the railings.
My side porch measures 22-1/2-past-7 feet. I replaced all but most 4 anxiety of the entire side of my porch with force per unit area-treated T&G lumber that I milled myself for a cost of less than $300.00. Comparing that to what a contractor would accuse for the same piece of work, it makes me glad I know how to practice it myself.

How To Repair Rotted Porch Floor,
Source: https://extremehowto.com/repair-for-an-old-wooden-porch/
Posted by: boydafterand.blogspot.com
0 Response to "How To Repair Rotted Porch Floor"
Post a Comment